My Ichiban Lager clone is still cold-aging in the fridge, will probably bottle it at the end of the month. My extract blueberry wheat, which I made for Mrs. Brew Dude, is close to ready for bottling after a very vigorous fermentation. A stray blueberry actually got stuck in the airlock and the fermentation gases actually cause a few berries to burp out of the top of the bucket, causing a small mess. I think we're still ok, sanitation-wise, as tastes out of the fermentor have been promising.
Next batch will be an all-grain American Wheat, just in time for the dog days of summer. After that, I'll be planning my next few brews. Looking at another Pumpkin Ale, maybe a Brown, a stout, and wondering if I have the patience for a Barelywine. Strong beers like Barleywine need lots of time to mellow in the bottle, just like grape wine, and many recipes recommend 6 months to a year in the bottle before cracking them open. I'm having enough trouble waiting for my 6-week lagering process...
Lots of summer beers have been rolling out around town, my favorites so far have been Magic Hat's Whacko Summer Ale (wheaty and crisp), and South Hampton's Double White. It's a very sweet, higher alcohol, Begian-style wheat beer. I found both on tap at Rocket Bar in Chinatown.
Stay cool out there!
Showing posts with label homebrewing. Show all posts
Showing posts with label homebrewing. Show all posts
Monday, July 13, 2009

Thursday, June 18, 2009
All Grain Brewing Made Easy
Traditonal homebrewers who make the switch to all grain brewing (no extract syrup) have fairly complex setups with at least two, but more likely three vessels: a hot water tun (holder), a mash tun, and the brew kettle.
Being that I live in a 600 sq. ft. condo, this isn't really feasible for me. So I did some research and found out about an innovative technique originated in Australia called Brew in a Bag.
In essence, instead of mashing and sparging (rinsing) the grains in a separate vessel, I used a $2 nylon mesh paint straining bag to mash the grains in the full boil volume of water in my brew kettle. Join me on my adventure...
Brew day starts like any other: sanitizing, getting ingredients ready, weighing out hops, etc.
On this brew day, I was trying a Kirin Ichiban clone, using 4 lbs of American 6-row barley and 1 lb of flaked rice adjunct, 1 oz Hallertauer Hops, and dry lager yeast (to save a bit o' green).
 Since we are using flaked rice, this will require a multi-step mash to adequately break down the fermentable sugars in our grains. The first step is to heat up the strike water that the grain will be added to. I want my final volume into the fermentor to be 2.5 gallons, so I have 3.5 gallons in the brew kettle to start to compensate for the grains soaking up water and whatever will steam off during the boil.
 As you can see, the paint strainer bag fits nicely over my 5 gallon brew kettle. Once the water is sufficiently heated, we dump in the grain and stir, stir, stir.
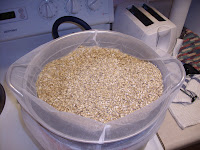 My lager recipe call for rests at 122°, 140°, 158° and mash-out at 170°F. Traditional brewers accomplish these rests by starting with less water and adding more hot water as they go along. But I just used my stove top and the last few minutes of one rest to ramp up to the next one. Seemed to work ok.
 Once the mash is complete and most of the fermentable sugars have been steeped out of the grains, we simply lift the strainer bag out of the brew kettle and the sweet wort is left behind. I put the moist grains in a colander resting on top of my brew kettle and let it drip for a few more minutes.
 After that, brewing proceeds as normal, with three hop additions splitting up the hour-long boil.
 After the boil, I chilled the wort off in the sink. I may need to buy a bag of ice for my next brew, since there is a lot of thermal mass in there and just sitting in cool sink water led to about a 45 mintue wait until it had reached yeast pitching temperature.
 Since this is a lager, I let it begin fermentation for one day at room temp, and then stuck it in the fridge. Hopefully this will produce a clean, crisp summer beer.
.
I have tried the BIAB technique once before, with an American Pale Ale. I cracked open the first one of those this week:
 As you can see, it's a bit hazy with a decent white head. It is less hoppy than most examples, with a smell I can only describe as beery (in the most positive sense one can take that). It has a sweet, bready and fruity taste, and finishes with an ever-so-slightly hoppy and crisp aftertaste.
I love this beer. I predict that it will not last long.
.
So if anyone out there wants to get into all grain brewing but doesn't think they have the chops or space, give Brew in a Bag a try. The freshness you get from using grains instead of extract is worth the additional equipment investment and grains are much cheaper than syrup anyway, so you'll save money in the long run!
.
.
Happy brewing and drinking!
Monday, June 8, 2009
American Pale Ale
I had to let my American Pale Ale ferment longer than usual, as it was still very cloudy with active yeast at the 2 week mark. But, but Sunday evening it had cleared up and it was time to bottle.
As my fans know, bottling can be a pain. I had not found a good way to add the necessary priming sugar to the bottles for the yeast to eat and carbonate the beer. Adding sugar to each bottle was tedious and imprecise, and led to sticky bottlenecks.
So then I tried CarbTabs, which are premeasured, compressed sugar pills that can be dumped in the bottle. The problem with these was they never dissolved all the way, so there were white bits floating around in the finished product. They didn't taste like anything or register as a texture on the tongue, but they definitely made the beer look like crap.
So, I decided to use my two container system for bottling. I added the priming sugar (1/3 cup of sugar, boiled in 1 cup water and cooled) to the Mr. Beer fermentor, bought some vinyl tubing, and let the beer run from the bucket fermentor, through the tubing, and mix with the priming solution in the Mr. Beer keg. I did not snap a pic, but my mad Photoshop skillz can offer this approximation:
As my fans know, bottling can be a pain. I had not found a good way to add the necessary priming sugar to the bottles for the yeast to eat and carbonate the beer. Adding sugar to each bottle was tedious and imprecise, and led to sticky bottlenecks.
So then I tried CarbTabs, which are premeasured, compressed sugar pills that can be dumped in the bottle. The problem with these was they never dissolved all the way, so there were white bits floating around in the finished product. They didn't taste like anything or register as a texture on the tongue, but they definitely made the beer look like crap.
So, I decided to use my two container system for bottling. I added the priming sugar (1/3 cup of sugar, boiled in 1 cup water and cooled) to the Mr. Beer fermentor, bought some vinyl tubing, and let the beer run from the bucket fermentor, through the tubing, and mix with the priming solution in the Mr. Beer keg. I did not snap a pic, but my mad Photoshop skillz can offer this approximation:
 Truly a thing of beauty, yes?
So after the beer was mixed with the priming solution, I sanitized the bottles and filled and capped them. Should be nice and carbonated in 2 weeks, but I usually pop one at 1 week, just to see how things are going.
Tastes out of the fermentor have been promising. The "fresh" taste from doing it all-grain vs. using the extract syrup is very apparent and once it's carbonated and chilled, I think I'll have some great beer on hand.
Stay tuned for a full work-up on an all-grain batch, and reviews of the Pale Ale.
¡Salud!
Thursday, May 7, 2009
Still alive
As The Onion's Jim Anchower says, Hola Amigos, I know it's been a long time since I rapped at ya, but it's been crazier than a bag of rats around here.
I'm kind of in a holding pattern with the brewing. Mrs. Brew Dude will be leaving for her internship soon, and then I can really take over the kitchen, so stay tuned.
Beer-wise, I haven't run into any new favorites. We had some pizza at Pete's in Columbia Heights, and they have a beer on tap called Lagunita's Pale Ale that tastes like freshly-mown grass.
I'm kind of in a holding pattern with the brewing. Mrs. Brew Dude will be leaving for her internship soon, and then I can really take over the kitchen, so stay tuned.
Beer-wise, I haven't run into any new favorites. We had some pizza at Pete's in Columbia Heights, and they have a beer on tap called Lagunita's Pale Ale that tastes like freshly-mown grass.
Some people dig the really hoppy stuff, but I say when the beer actually takes on a plant-like flavor, it's time to dial it back a notch. We couldn't even finish the pitcher. Sad panda.
For Cinco de Mayo, we went very traditional and had a couple dozen Natty Bohs. At $2 per can at the Red Derby, it's hard to beat. It's definitely better than it has to be for the price.
Homebrew-wise, we're almost done drinking the green chile beer, the Coffee Stout is ready to chill this evening, and our Steam clone will be ready to drink soon. I want to get a sixer of Anchor Steam and do a side-by-side comparison. I know it seems crazy to drink two beers at once, but this is the life I chose.
See you all later.
Tuesday, April 21, 2009
Brew Day: Partial Mashing
Apologies for the lateness of this post.
The partial mash went very well. In a couple weeks, I will be drinking my Steam beer.
Recipe:
~3 lbs of Pale/Gold Malt Extract
1/2 lb of Crystal 40 Malted Barley
2 oz of Maltodextrin powder (non-fermentable sugar that adds body but little to no flavor)
1 oz of Perle pellet hops (3/4 oz boiled for 1 hour, 1/4 oz boiled for 10 minutes)
1 pouch California Lager liquid yeast (made into a starter)
Lots and lots of DC tap water. MMMMM-mmmm

The first thing you do on any brew day is boil a bunch of water. You need boiled water to go in the fermentor, but also to do lots of small little things like rinse off things that need to stay sanitized.

While that's boiling, sanitize all equipment that will touch the wort once it's cool. That means the fermentor, thermometer, stirring spoon (maybe), etc.
Take a gallon of your pre-boiled water and cool it off in a water bath in the sink. It doesn't have to get all the way down to yeast-pitching temp, but you don't want to melt your fermentor, either.
And now, the big new step for a partial mash: Steeping your specialty grain.

There are dozens of kinds of grain that are used in brewing. The variety above is called Crystal 40. It is barley malt that has been kilned at higher temperatures, caramelizing some of the sugars. The number indicates how caramelized/dark it is. Crystal malts range from 20 (very light) to 120 (very dark).

We will steep this grain in 160 degree water for a half hour to extract a bunch of color and flavor. The grain sock is used so that it can be easily removed once steeping is complete.

While steeping, it smelled very sweet and bready. I was also very surprised at how quickly the color of the water changed.
After the grain steeped, brew day proceeded as it usually has for my previous extract batches. We add the Gold Malt Extract syrup:

I added the bulk of the hops at the beginning of the hour long boil. This is the "bittering stage." The alpha acids in the hop isomerize in the hot water, and cut a lot of the malty sweetness of the grain and extract.

Then, with 10 minutes left for the boil, I threw in the last 1/4 oz of hops. This is the "flavor and aroma stage." While the bittering hops' acids are cutting the sweetness, all of the aromatic oils are being boiled away. So in order to have some hoppy taste and smell, we add some hops here at the end of the boil.

Once the boil is over, we quickly chill the wort in a water bath in the sink. Then we pour that chilled wort into the fermentor and add our yeast from the start we made on Wednesday. A lot of liquid had evaporated during the boil, so I added some cooled boiled water to get back up the 2.5 gallon mark.
Give the whole thing a good shake to make sure there's plenty of oxygen for the yeast to party with.

The partial mash went very well. In a couple weeks, I will be drinking my Steam beer.
Recipe:
~3 lbs of Pale/Gold Malt Extract
1/2 lb of Crystal 40 Malted Barley
2 oz of Maltodextrin powder (non-fermentable sugar that adds body but little to no flavor)
1 oz of Perle pellet hops (3/4 oz boiled for 1 hour, 1/4 oz boiled for 10 minutes)
1 pouch California Lager liquid yeast (made into a starter)
Lots and lots of DC tap water. MMMMM-mmmm
The first thing you do on any brew day is boil a bunch of water. You need boiled water to go in the fermentor, but also to do lots of small little things like rinse off things that need to stay sanitized.
While that's boiling, sanitize all equipment that will touch the wort once it's cool. That means the fermentor, thermometer, stirring spoon (maybe), etc.
Take a gallon of your pre-boiled water and cool it off in a water bath in the sink. It doesn't have to get all the way down to yeast-pitching temp, but you don't want to melt your fermentor, either.
And now, the big new step for a partial mash: Steeping your specialty grain.
There are dozens of kinds of grain that are used in brewing. The variety above is called Crystal 40. It is barley malt that has been kilned at higher temperatures, caramelizing some of the sugars. The number indicates how caramelized/dark it is. Crystal malts range from 20 (very light) to 120 (very dark).
We will steep this grain in 160 degree water for a half hour to extract a bunch of color and flavor. The grain sock is used so that it can be easily removed once steeping is complete.
While steeping, it smelled very sweet and bready. I was also very surprised at how quickly the color of the water changed.
After the grain steeped, brew day proceeded as it usually has for my previous extract batches. We add the Gold Malt Extract syrup:
I added the bulk of the hops at the beginning of the hour long boil. This is the "bittering stage." The alpha acids in the hop isomerize in the hot water, and cut a lot of the malty sweetness of the grain and extract.
Then, with 10 minutes left for the boil, I threw in the last 1/4 oz of hops. This is the "flavor and aroma stage." While the bittering hops' acids are cutting the sweetness, all of the aromatic oils are being boiled away. So in order to have some hoppy taste and smell, we add some hops here at the end of the boil.
Once the boil is over, we quickly chill the wort in a water bath in the sink. Then we pour that chilled wort into the fermentor and add our yeast from the start we made on Wednesday. A lot of liquid had evaporated during the boil, so I added some cooled boiled water to get back up the 2.5 gallon mark.
Give the whole thing a good shake to make sure there's plenty of oxygen for the yeast to party with.

And voila! Our Steam beer is fermenting happily in the Mr. Beer keg. It had a nice, thick kreusen on it by Sunday evening, indicating healthy and vigorous fermentation. Bottling on May 2! Stay tuned!
Wednesday, April 15, 2009
Steam Beer Step 2: Making a starter
Yesterday, I smacked my smak-pak of yeast. If the pack swelled, that was my sign that I had healthy, strapping young yeast to work with. Judge for yourself:

So, now that the yeast pack is definitely viable, we brew up a starter wort. To do this, I boiled 1 cup of extract with 1 quart of water for 10 minutes. I also added a little baking yeast to the boil. These yeast cells are killed in the boil, and dead yeast cells make excellent food for our living (and much more expensive) yeast cells.

After the boil, I cooled the starter wort by placing the covered pot in a pool of cold water in the sink. While that was cooling, I sanitized the large water bottle that would be holding the starter, as well as the outside of the yeast pack and a pair of scissors (can't be too careful when it comes to sanitation).
Then I added the wort and yeast to the bottle. The liquid yeast is a very light tan, sort of like cat formula:

Once it was all together, i gave it a good shake to make sure there was enough dissolved oxygen for the yeast to party with. Then i put the cap on loosely and put a piece of plastic wrap over the top. This is to allow gases to escape, and hopefully keep any bad nasties out.
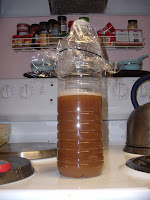
Stay tuned for the main event! Beermageddon!
So, now that the yeast pack is definitely viable, we brew up a starter wort. To do this, I boiled 1 cup of extract with 1 quart of water for 10 minutes. I also added a little baking yeast to the boil. These yeast cells are killed in the boil, and dead yeast cells make excellent food for our living (and much more expensive) yeast cells.
After the boil, I cooled the starter wort by placing the covered pot in a pool of cold water in the sink. While that was cooling, I sanitized the large water bottle that would be holding the starter, as well as the outside of the yeast pack and a pair of scissors (can't be too careful when it comes to sanitation).
Then I added the wort and yeast to the bottle. The liquid yeast is a very light tan, sort of like cat formula:
Once it was all together, i gave it a good shake to make sure there was enough dissolved oxygen for the yeast to party with. Then i put the cap on loosely and put a piece of plastic wrap over the top. This is to allow gases to escape, and hopefully keep any bad nasties out.

And there it is, a finished yeast starter. I will let this ferment until brew day on Saturday, when the whole thing will be pitched into the main wort.
Stay tuned for the main event! Beermageddon!
Tuesday, April 14, 2009
Steam Beer Part 1: Smack my yeast up
As I gear up for my first partial mash this weekend, there are a few steps I need to take to get ready. I order the ingredients for this batch from midwestsupplies.com, since it is cheaper than my usual suppliers of Mr. Beer and Stomp Them Grapes. I learned too late however, that the reson the yeast was so cheap is that the packet doesn't come with enough cells to do the job.
 The packet come with 25 billion yeast cells, and I am going to need at least 100 billion. So now I have to become a yeast farmer, consarnit!
Liquid yeast packets have an inner package of yeast nutrient that needs to be ruptured to activate the yeast and get them going. Luckily, I have great slapping experience from initiating several duels to defend my honor.
 I am now letting the least wake up and get happy until this evening. Then, I will pitch the yeast into a starter wort: a small amount of malt that the yeast can eat to power their furious, passionate reproduction. Slow jazz optional.
Stay tuned for Part 2: Starter? I barely knew her!
.
 The packet come with 25 billion yeast cells, and I am going to need at least 100 billion. So now I have to become a yeast farmer, consarnit!
Liquid yeast packets have an inner package of yeast nutrient that needs to be ruptured to activate the yeast and get them going. Luckily, I have great slapping experience from initiating several duels to defend my honor.
I am now letting the least wake up and get happy until this evening. Then, I will pitch the yeast into a starter wort: a small amount of malt that the yeast can eat to power their furious, passionate reproduction. Slow jazz optional.Stay tuned for Part 2: Starter? I barely knew her!
.
Monday, April 6, 2009
Weizenbock

 My weizenbock (dark wheat) was ready to drink this weekend.
As you can see, it's a deep, dark red. Taste-wise, this is the hoppiest beer I've made so far, but they aren't aggressive and blend nicely into the caramel sweetness in the finish. A very nice beer to sip while chatting with friends or watching tv.
The problem with the Mr. Beer ingredients I seem to be having is that, while the beer tastes good, I wish there was more to it. I think it has to do with how the ingredients are portioned. Mr. Beer recommends two cans of extract per half-gallon batch, which equates to roughly 2 lbs 6 oz of extract per 2.5 gallon batch. Most recipes call for at least 3 lbs of fermentables per 2.5 gallons.
My last batch of Mr. Beer-ingredient beer (a hazelnut coffee brown) is in the fermentor now. After that, I think I may be done with Mr. Beer ingredients for the time being and have already ordered stuff for my first partial mash: A Steam-style beer!
Stay tuned for a full partial mash rundown!
Tuesday, March 24, 2009
A question of taste

Well folks, we're very nearly out of our Mr. Beer ingredients and I'm looking at taking the next step to partial mashing.
Most kinds of beer can be brewed with base malt extract and steeping a small amount of "specialty grains," which are various toasted, roasted, or caramelized grains that will add greater taste, complexity and freshness to the beer.
I'm considering trying a California Common ("Steam") beer for my first partial mash.

I love the taste of this beer on draft. Out of the bottle is very good, too, but the hop bitterness is more apparent.
So what do you say, tasting community? A steam beer, or something else?
Sunday, March 22, 2009
Frickin S'Wheat
This weekend we opened the first couple bottles of our Spiced Wheat.

As you can see, it has a nice, deep amber color. The low head retention was my fault: I poured a little too gently down the side of the glass.
Taste-wise, it's silky smooth with none of the tartness you find in a lot of wheat beer. The sweetness of the malt balances pretty well with the minimal Liberty hop bitterness, and spice from the orange zest, cloves and coriander.
We took a six-pack to a party and people seemed to really like it. I predict this batch won't last very long.
Also bottled my Weizenbock on Sunday. I am officially done adding sugar to bottles. It's a pain in the ass and not worth the potential to introduce bad nasties to the beer. Going to order a bunch of PrimeTabs, which are compressed, sanitized corn sugar cubes. That is, unless my wife will let me start kegging. What do you think, honey?

As you can see, it has a nice, deep amber color. The low head retention was my fault: I poured a little too gently down the side of the glass.
Taste-wise, it's silky smooth with none of the tartness you find in a lot of wheat beer. The sweetness of the malt balances pretty well with the minimal Liberty hop bitterness, and spice from the orange zest, cloves and coriander.
We took a six-pack to a party and people seemed to really like it. I predict this batch won't last very long.
Also bottled my Weizenbock on Sunday. I am officially done adding sugar to bottles. It's a pain in the ass and not worth the potential to introduce bad nasties to the beer. Going to order a bunch of PrimeTabs, which are compressed, sanitized corn sugar cubes. That is, unless my wife will let me start kegging. What do you think, honey?
Wednesday, March 18, 2009
The Setup...
Due to popular demand, I'm going to show you good people our homebrew setup.
The one that started it all...
The one that started it all...

My Weizenbock is fermenting happily on our kitchen shelf next to some salvaged, pry-off bottles that it will go into this weekend. The two-handled thing is the bottle capper.
And the fermentor that we made ourselves.

A good fermentor only has two requirements: it can hold liquid, and have some method of allowing gases to escape, while not letting any bad nasties in. We used a rubber stopper and airlock setup. The liquid in the airlock is vodka. You want something that won't harbor bacteria.
In order to avoid buying (and having to store) any siphon equipment, I recommend installing a bottling spigot on the fermentor as well. If the bottom of the spigot inlet is about 1/2 inch from the bottom of the bucket, you should be safe from getting any trub (gunk from the bottom) in your bottles. Also, avoid the spring-loaded spigots, as the spring will lose tension over time and you will lose your airtight seal.
I got the bucket and lid from usplastics.com and the stopper, airlock, and spigot from stompthemgrapes.com. All together with shipping, it was about $20. Also, you will need a 1 inch spade drill bit and an electric drill to make the holes in your bucket.
Tuesday, March 17, 2009
Beer update
A list of what's going on, beer-wise:
My Spiced Wheat Beer will be ready to drink this weekend. Cloves, coriander, orange zest and Liberty Hop pellets went into the boil, and tastes out of the fermentor have been very promising. Anticipating something similar to a Leinie's Sunset Wheat or maybe a Hoegaarden.
Also this weekend, my Weizenbock (Dark Wheat) should be ready to bottle. This will be my hoppiest beer to date, as the extract I used was pre-hopped and I added the balance of my Liberty Hops as well.
The Sweet Chile O' Mine (green chili ale) will need another week in the main fermentor. Our airlock hasn't been bubbling like I expected, but I held up a flashlight to the outside of the fermentor and there is definitely a decent kreusen on top, so we shall see.
My Spiced Wheat Beer will be ready to drink this weekend. Cloves, coriander, orange zest and Liberty Hop pellets went into the boil, and tastes out of the fermentor have been very promising. Anticipating something similar to a Leinie's Sunset Wheat or maybe a Hoegaarden.
Also this weekend, my Weizenbock (Dark Wheat) should be ready to bottle. This will be my hoppiest beer to date, as the extract I used was pre-hopped and I added the balance of my Liberty Hops as well.
The Sweet Chile O' Mine (green chili ale) will need another week in the main fermentor. Our airlock hasn't been bubbling like I expected, but I held up a flashlight to the outside of the fermentor and there is definitely a decent kreusen on top, so we shall see.
Monday, March 16, 2009
Double the fermentors, double the fun.
This weekend, my wife and I constructed a second fermentor. We are going to continue using the Mr. Beer "keg" fermentor, and we made a more traditional bucket/airlock/spigot for the second one.
Lots of jags on homebrew forums like to make fun of Mr. Beer, but if space is at a premium, you can't beat a fermentor that can fit on a bookshelf.
Our second fermentor is also very manageable. We decided to use a bucket that will accomodate the same 2.5 gallon size batch as the Mr. Beer. This way, we can have different batches going, split up a full 5 gallon recipe, or use one as a primary and one as a secondary (common with making lagers).
Lots of jags on homebrew forums like to make fun of Mr. Beer, but if space is at a premium, you can't beat a fermentor that can fit on a bookshelf.
Our second fermentor is also very manageable. We decided to use a bucket that will accomodate the same 2.5 gallon size batch as the Mr. Beer. This way, we can have different batches going, split up a full 5 gallon recipe, or use one as a primary and one as a secondary (common with making lagers).
DC. Shit.
Welcome to "My Condo. My Brewery." A Missouri-to-DC transplant's blog dedicated mostly to beer, but I'll also throw in some stuff about TV, horror movies, weightlifting, videogames and anything else I feel like. Basically the whole Gen-Y Male Experience.
Recently, I have begun brewing my own beer at home. I began with a Mr. Beer kit, purchased from a Bed, Bath and Beyond on a whim. A couple mediocre or awful batches later, I decided to get serious. I would recommend that anyone just starting in brewing read John Palmer's How to Brew. The first edition is free online here.
One of my main hopes for this blog is that it serves as a resource to anyone else who enjoys beer but doesn't think they have the skill or space to start homebrewing. If I can do it in my 600 sq. ft. condo, you can pretty much do it anywhere.
So pour a pint and join me, won't you?
Recently, I have begun brewing my own beer at home. I began with a Mr. Beer kit, purchased from a Bed, Bath and Beyond on a whim. A couple mediocre or awful batches later, I decided to get serious. I would recommend that anyone just starting in brewing read John Palmer's How to Brew. The first edition is free online here.
One of my main hopes for this blog is that it serves as a resource to anyone else who enjoys beer but doesn't think they have the skill or space to start homebrewing. If I can do it in my 600 sq. ft. condo, you can pretty much do it anywhere.
So pour a pint and join me, won't you?
Subscribe to:
Posts (Atom)


