Traditonal homebrewers who make the switch to all grain brewing (no extract syrup) have fairly complex setups with at least two, but more likely three vessels: a hot water tun (holder), a mash tun, and the brew kettle.
Being that I live in a 600 sq. ft. condo, this isn't really feasible for me. So I did some research and found out about an innovative technique originated in Australia called Brew in a Bag.
In essence, instead of mashing and sparging (rinsing) the grains in a separate vessel, I used a $2 nylon mesh paint straining bag to mash the grains in the full boil volume of water in my brew kettle. Join me on my adventure...
Brew day starts like any other: sanitizing, getting ingredients ready, weighing out hops, etc.
On this brew day, I was trying a Kirin Ichiban clone, using 4 lbs of American 6-row barley and 1 lb of flaked rice adjunct, 1 oz Hallertauer Hops, and dry lager yeast (to save a bit o' green).
 Since we are using flaked rice, this will require a multi-step mash to adequately break down the fermentable sugars in our grains. The first step is to heat up the strike water that the grain will be added to. I want my final volume into the fermentor to be 2.5 gallons, so I have 3.5 gallons in the brew kettle to start to compensate for the grains soaking up water and whatever will steam off during the boil.
 As you can see, the paint strainer bag fits nicely over my 5 gallon brew kettle. Once the water is sufficiently heated, we dump in the grain and stir, stir, stir.
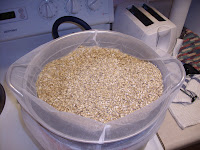 My lager recipe call for rests at 122°, 140°, 158° and mash-out at 170°F. Traditional brewers accomplish these rests by starting with less water and adding more hot water as they go along. But I just used my stove top and the last few minutes of one rest to ramp up to the next one. Seemed to work ok.
 Once the mash is complete and most of the fermentable sugars have been steeped out of the grains, we simply lift the strainer bag out of the brew kettle and the sweet wort is left behind. I put the moist grains in a colander resting on top of my brew kettle and let it drip for a few more minutes.
 After that, brewing proceeds as normal, with three hop additions splitting up the hour-long boil.
 After the boil, I chilled the wort off in the sink. I may need to buy a bag of ice for my next brew, since there is a lot of thermal mass in there and just sitting in cool sink water led to about a 45 mintue wait until it had reached yeast pitching temperature.
 Since this is a lager, I let it begin fermentation for one day at room temp, and then stuck it in the fridge. Hopefully this will produce a clean, crisp summer beer.
.
I have tried the BIAB technique once before, with an American Pale Ale. I cracked open the first one of those this week:
 As you can see, it's a bit hazy with a decent white head. It is less hoppy than most examples, with a smell I can only describe as beery (in the most positive sense one can take that). It has a sweet, bready and fruity taste, and finishes with an ever-so-slightly hoppy and crisp aftertaste.
I love this beer. I predict that it will not last long.
.
So if anyone out there wants to get into all grain brewing but doesn't think they have the chops or space, give Brew in a Bag a try. The freshness you get from using grains instead of extract is worth the additional equipment investment and grains are much cheaper than syrup anyway, so you'll save money in the long run!
.
.
Happy brewing and drinking!

GODZILLA ICHIBAN!!!
ReplyDeleteThat's racist.
ReplyDeleteWow. This is insane.
ReplyDeleteyou are my hero
ReplyDelete